NinjaTrader Import Guide
There are three ways to get your NinjaTrader trades into Tradavity:
- Option 1: Real-Time Desktop Sync (recommended) — A NinjaTrader indicator syncs every trade the moment you take it. Works with any broker (Rithmic, Tradovate, CQG, etc.).
- Option 2: Auto-Sync via OAuth — Automatic import every 15 minutes via the Tradovate API. Only works with Tradovate-connected accounts.
- Option 3: CSV Import — Manual export and upload from NinjaTrader 8.
Option 1: Real-Time Desktop Sync (Recommended)
A lightweight NinjaTrader indicator runs invisibly on your chart and sends each execution to Tradavity the moment it happens. Trades appear in your journal within seconds of closing a position.
- Tradavity is not responsible for missing trades resulting from network issues, incorrect settings, or NinjaTrader restarts.
- Test with a demo account first before using on a live account.
- The indicator must not be used with automated trading systems or bots.
- Add the indicator to one chart per account only. Adding it to multiple charts for the same account will cause duplicate sends.
Requirements
- A Tradavity PRO subscription
- NinjaTrader 8 Desktop (any broker connection)
Unlike Auto-Sync (Option 2), real-time sync works with any broker connected to NinjaTrader — including Rithmic, Tradovate, CQG, and all prop firm accounts. The indicator reads directly from NinjaTrader's execution engine.
Setup in Tradavity
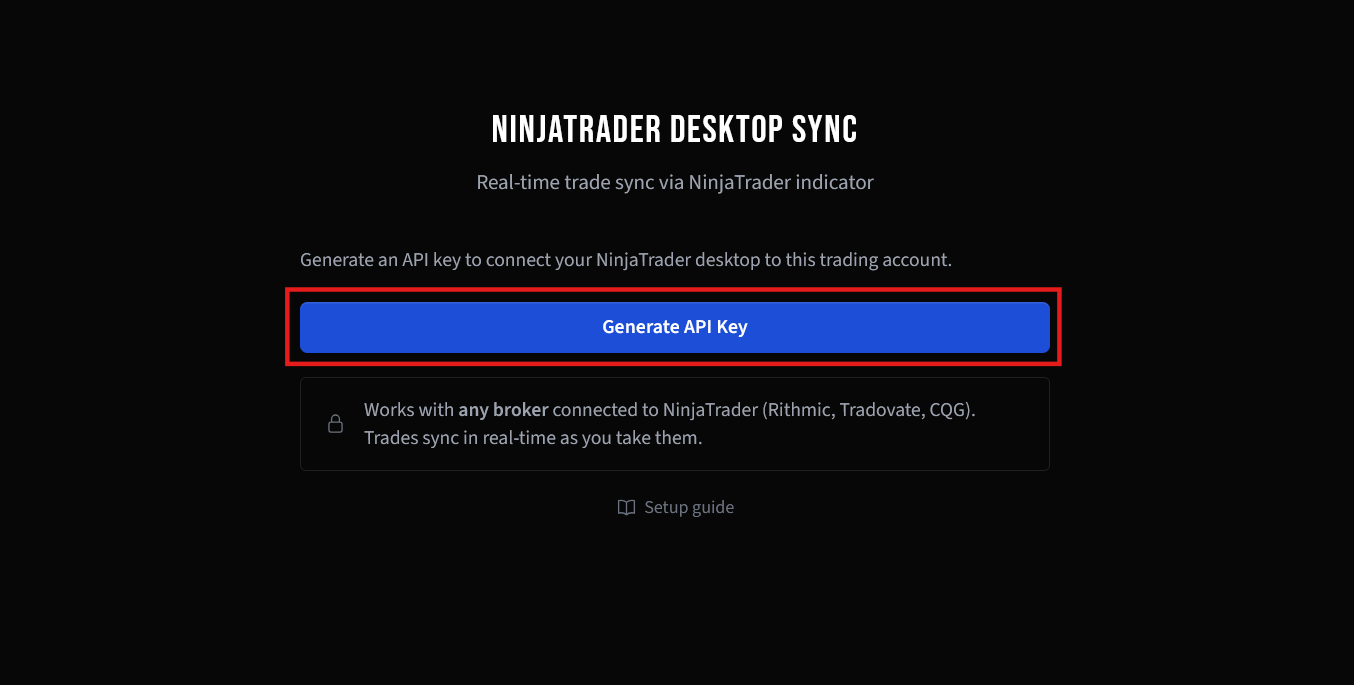
Step 1: Generate an API Key
In Tradavity, go to Settings → Accounts, click Sync on the account you want to connect, then choose Auto-Sync → NinjaTrader. Click Generate API Key.
Copy the key immediately — it is only shown once. If you lose it, you can revoke and generate a new one.
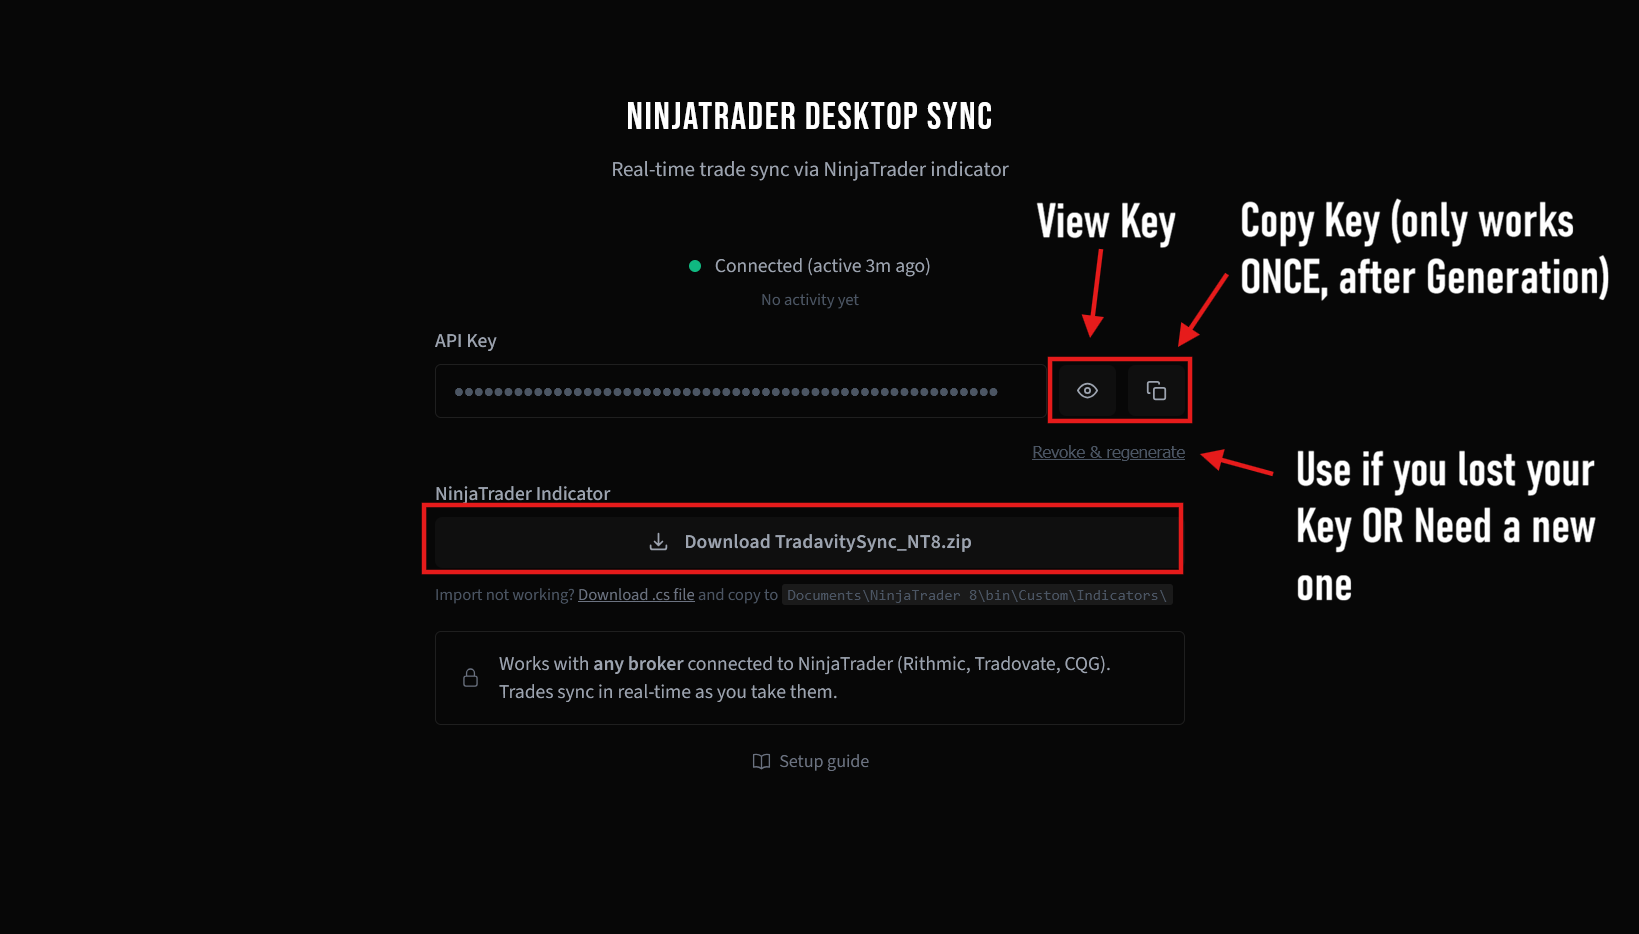
Step 2: Download the Indicator
Click Download TradavitySync_NT8.zip on the same page. Keep the file as a zip — do not extract it.
Setup in NinjaTrader
Step 3: Import the Indicator
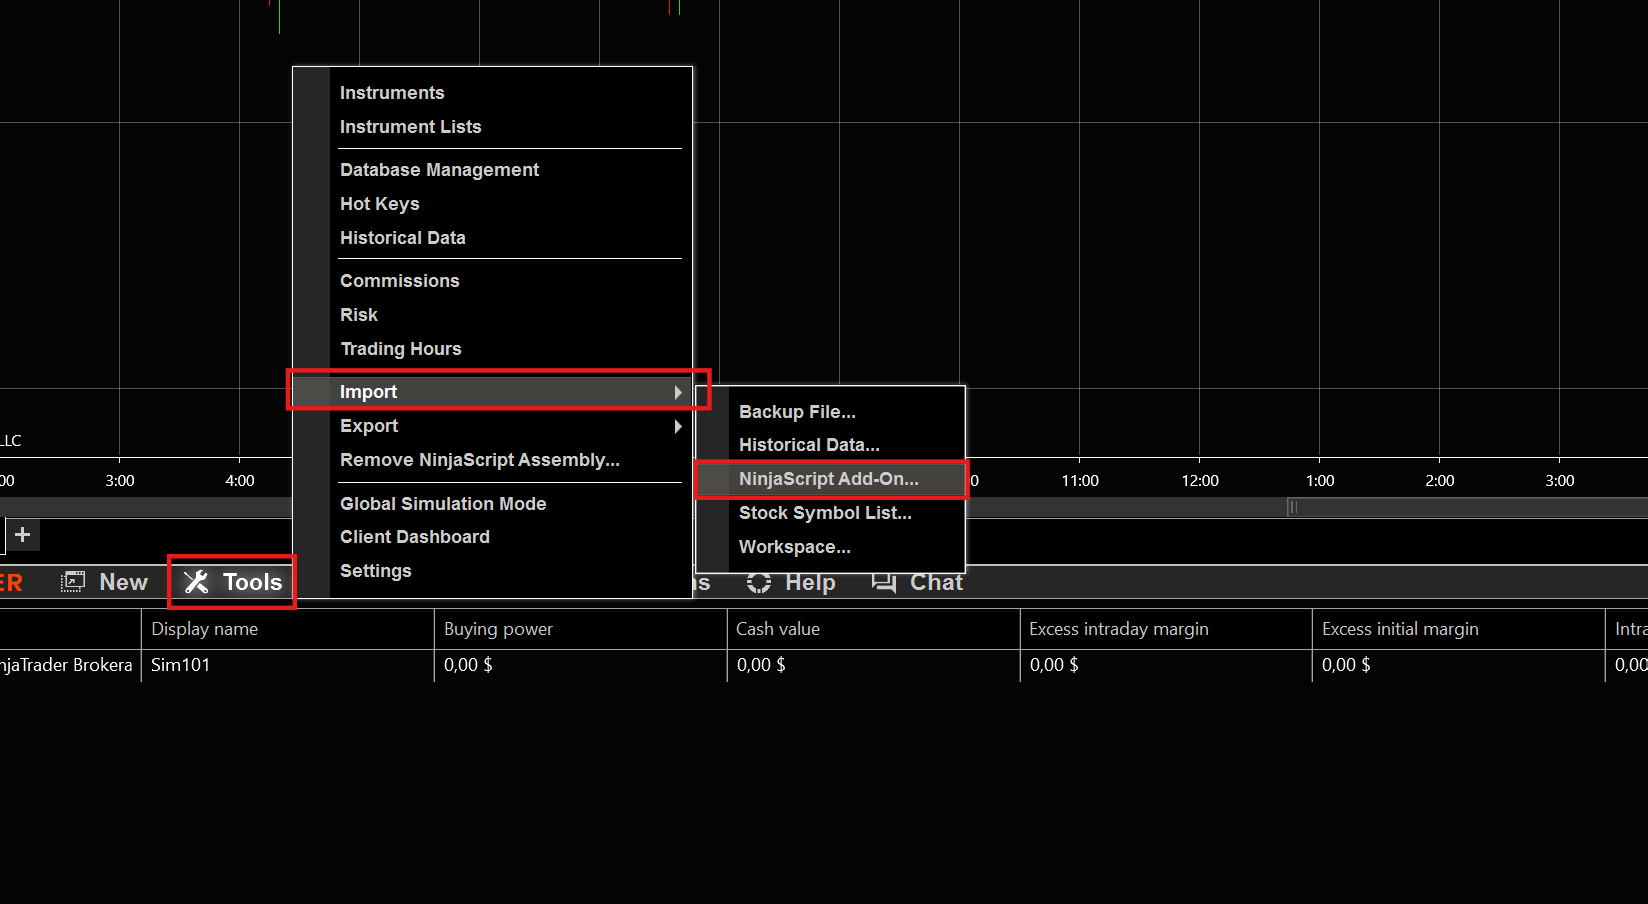
In NinjaTrader, go to Tools in the Control Center menu bar.
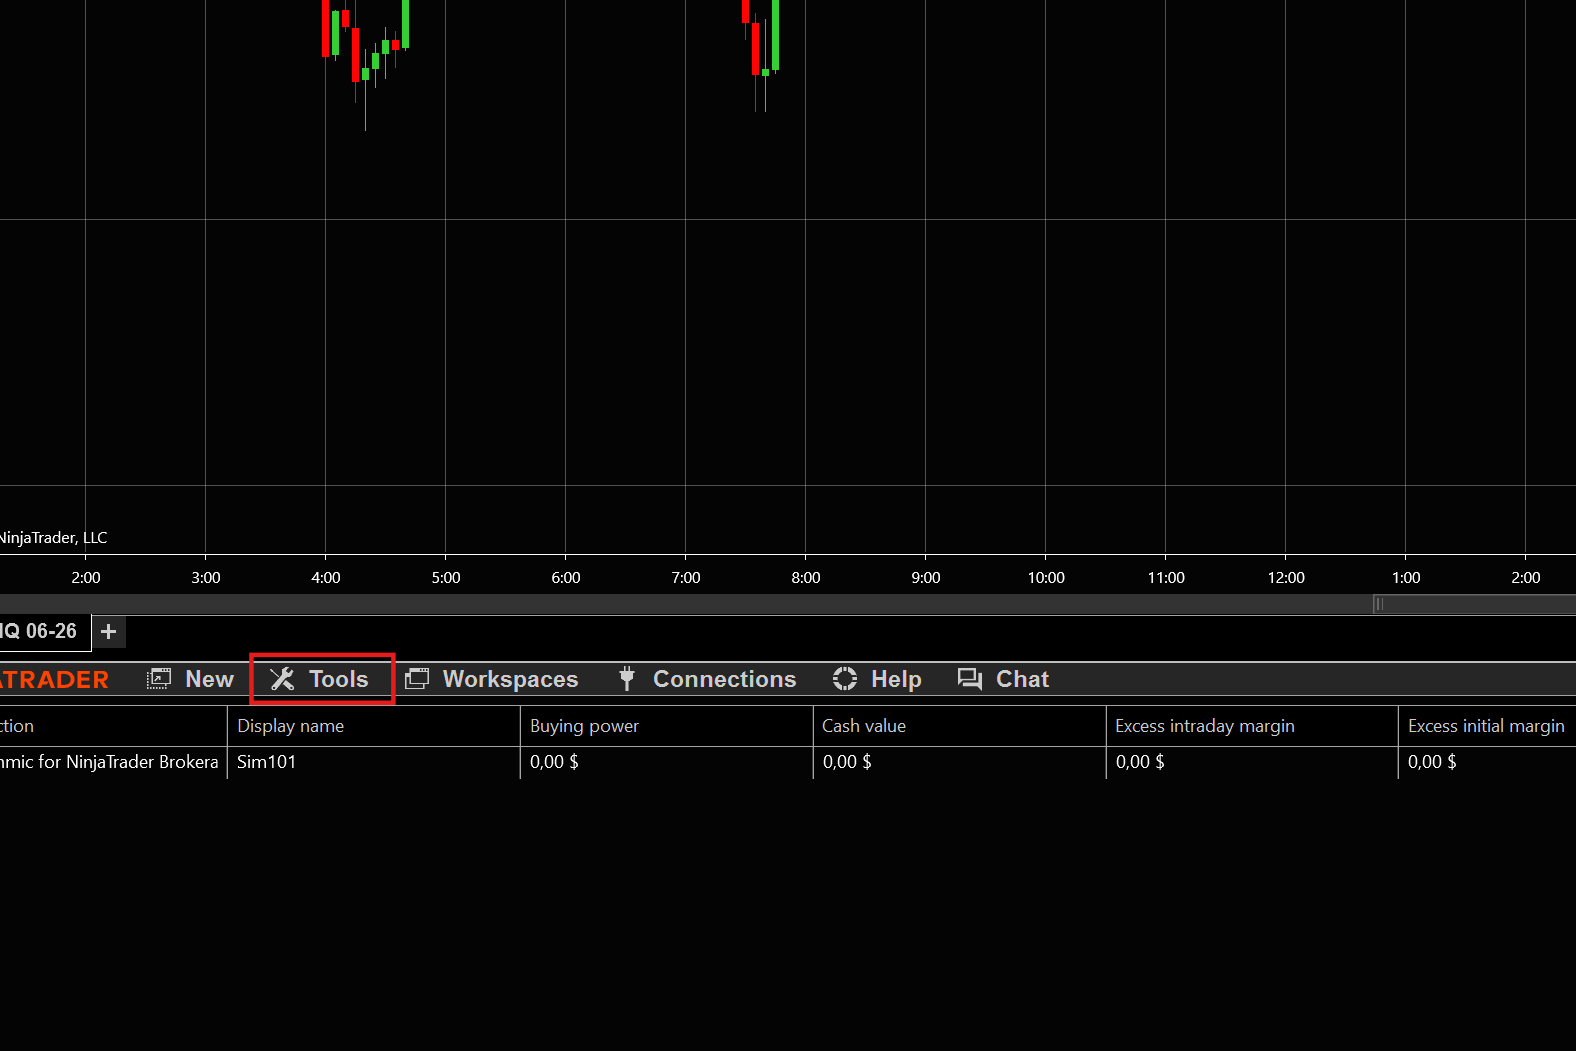
Click Import → NinjaScript Add-On and select the downloaded TradavitySync_NT8.zip file.
Step 4: Add Indicator to a Chart
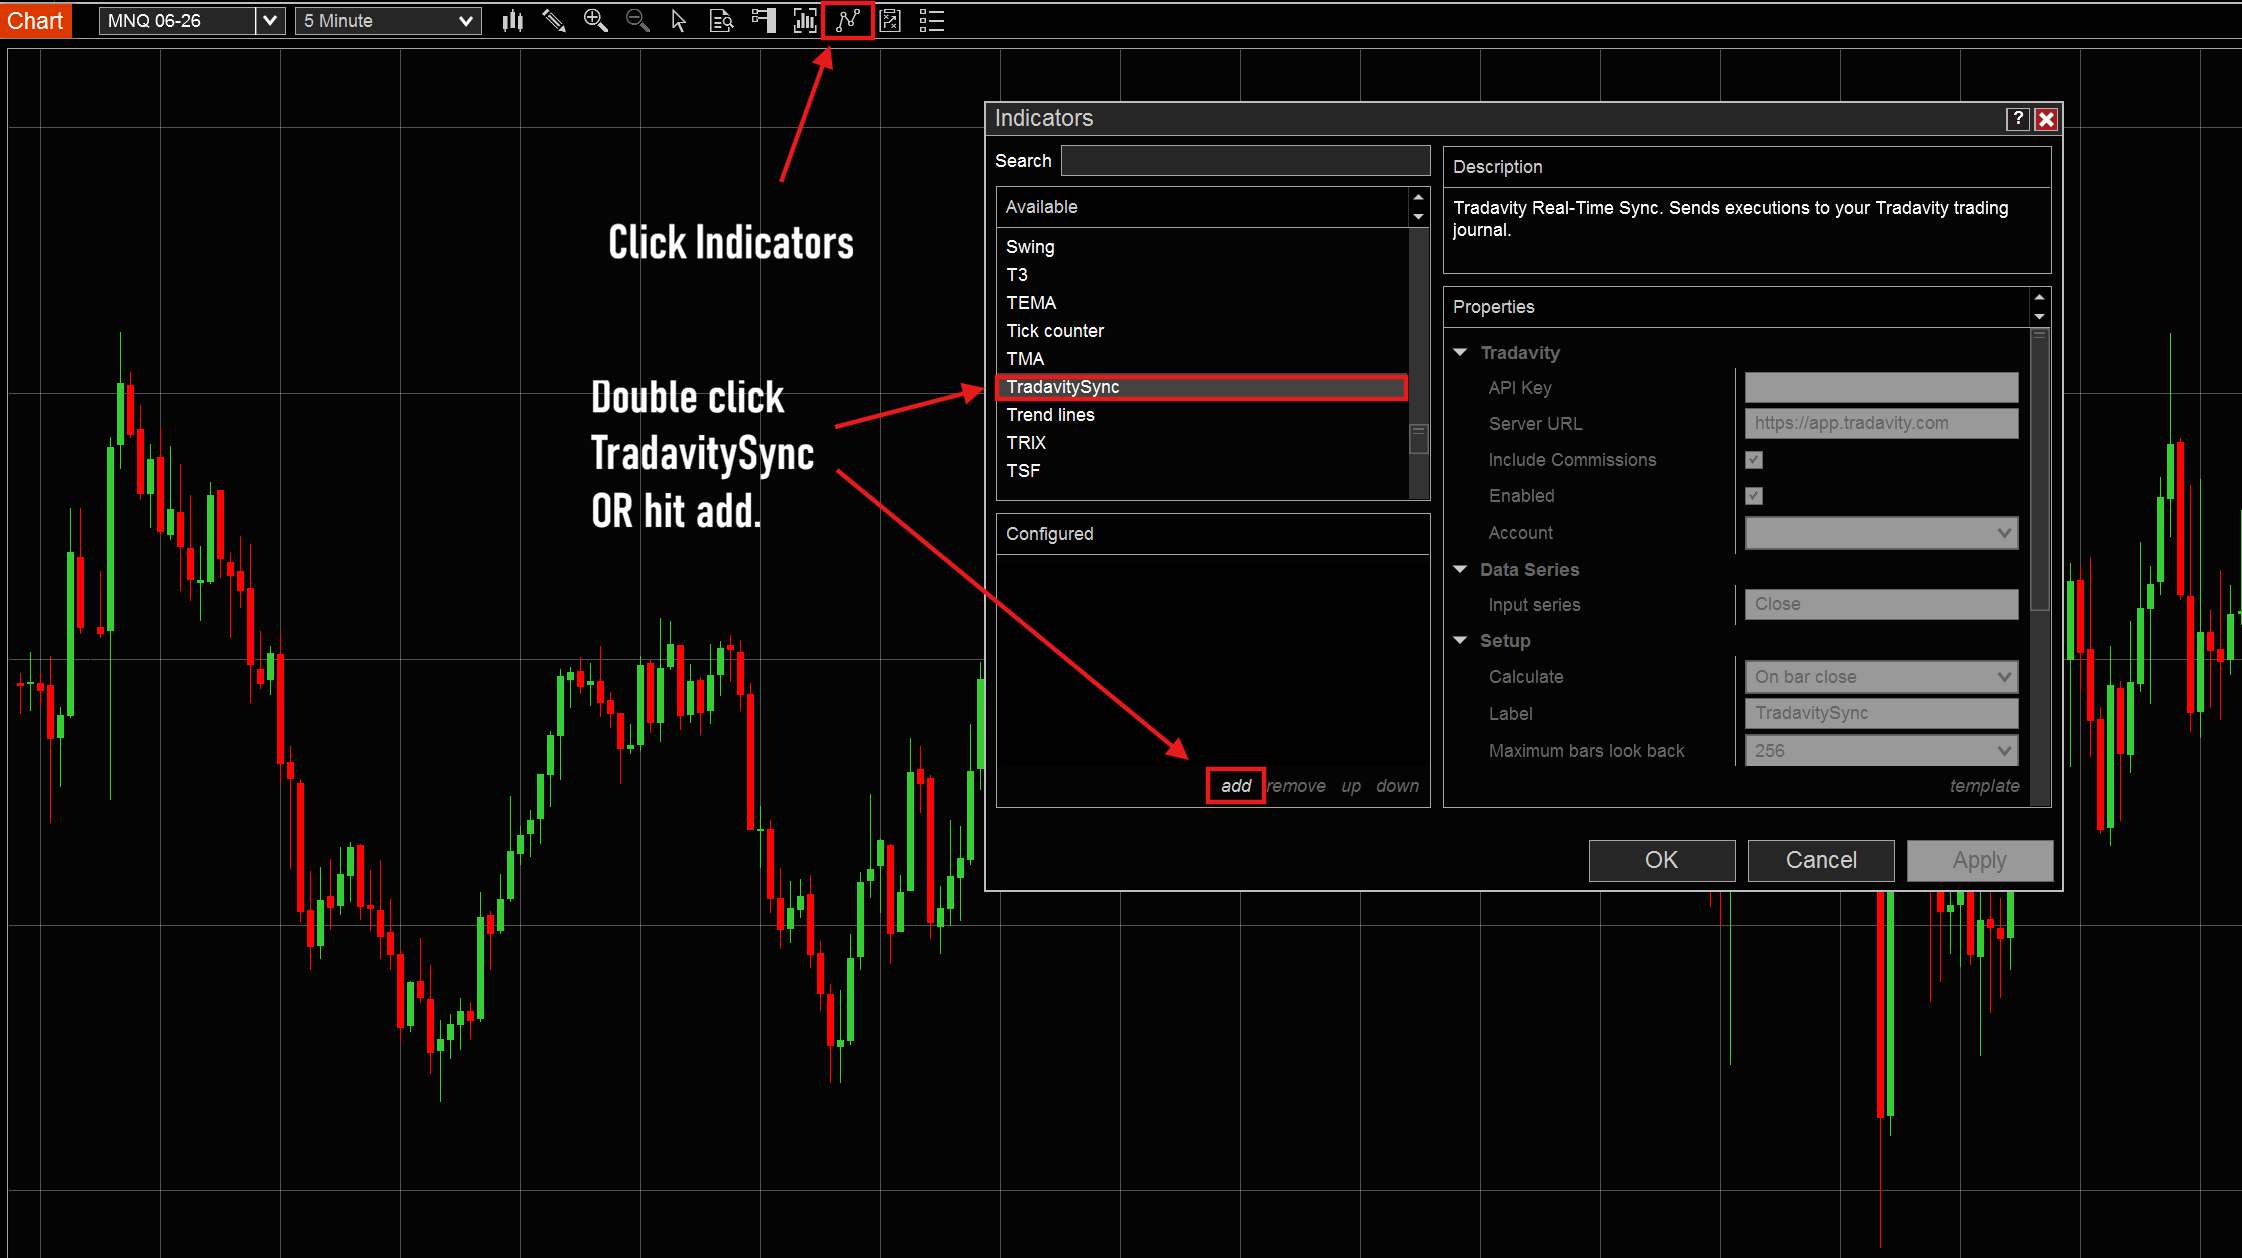
Open any chart, click Indicators in the top toolbar. Find TradavitySync in the list, double-click it or select it and click Add.
Step 5: Configure Settings
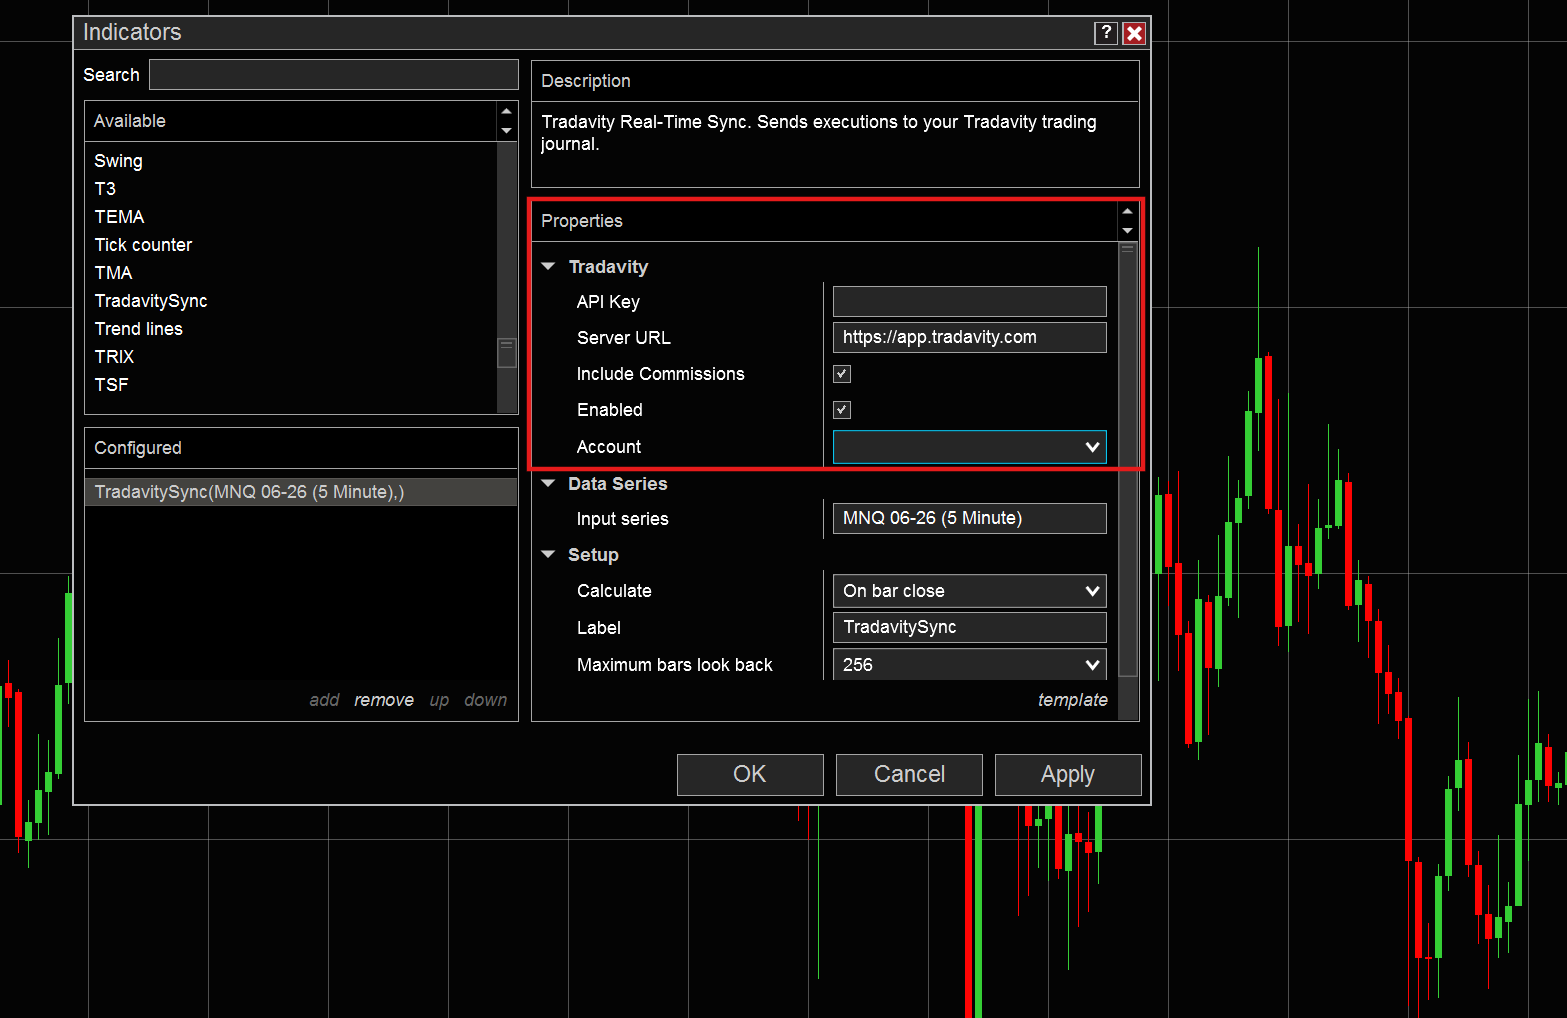
In the indicator properties panel on the right:
- Paste your API Key from Tradavity
- Set the Server URL (leave default for production:
https://app.tradavity.com) - Select your Account from the dropdown
- Click Apply, then OK
Step 6: Verify Connection
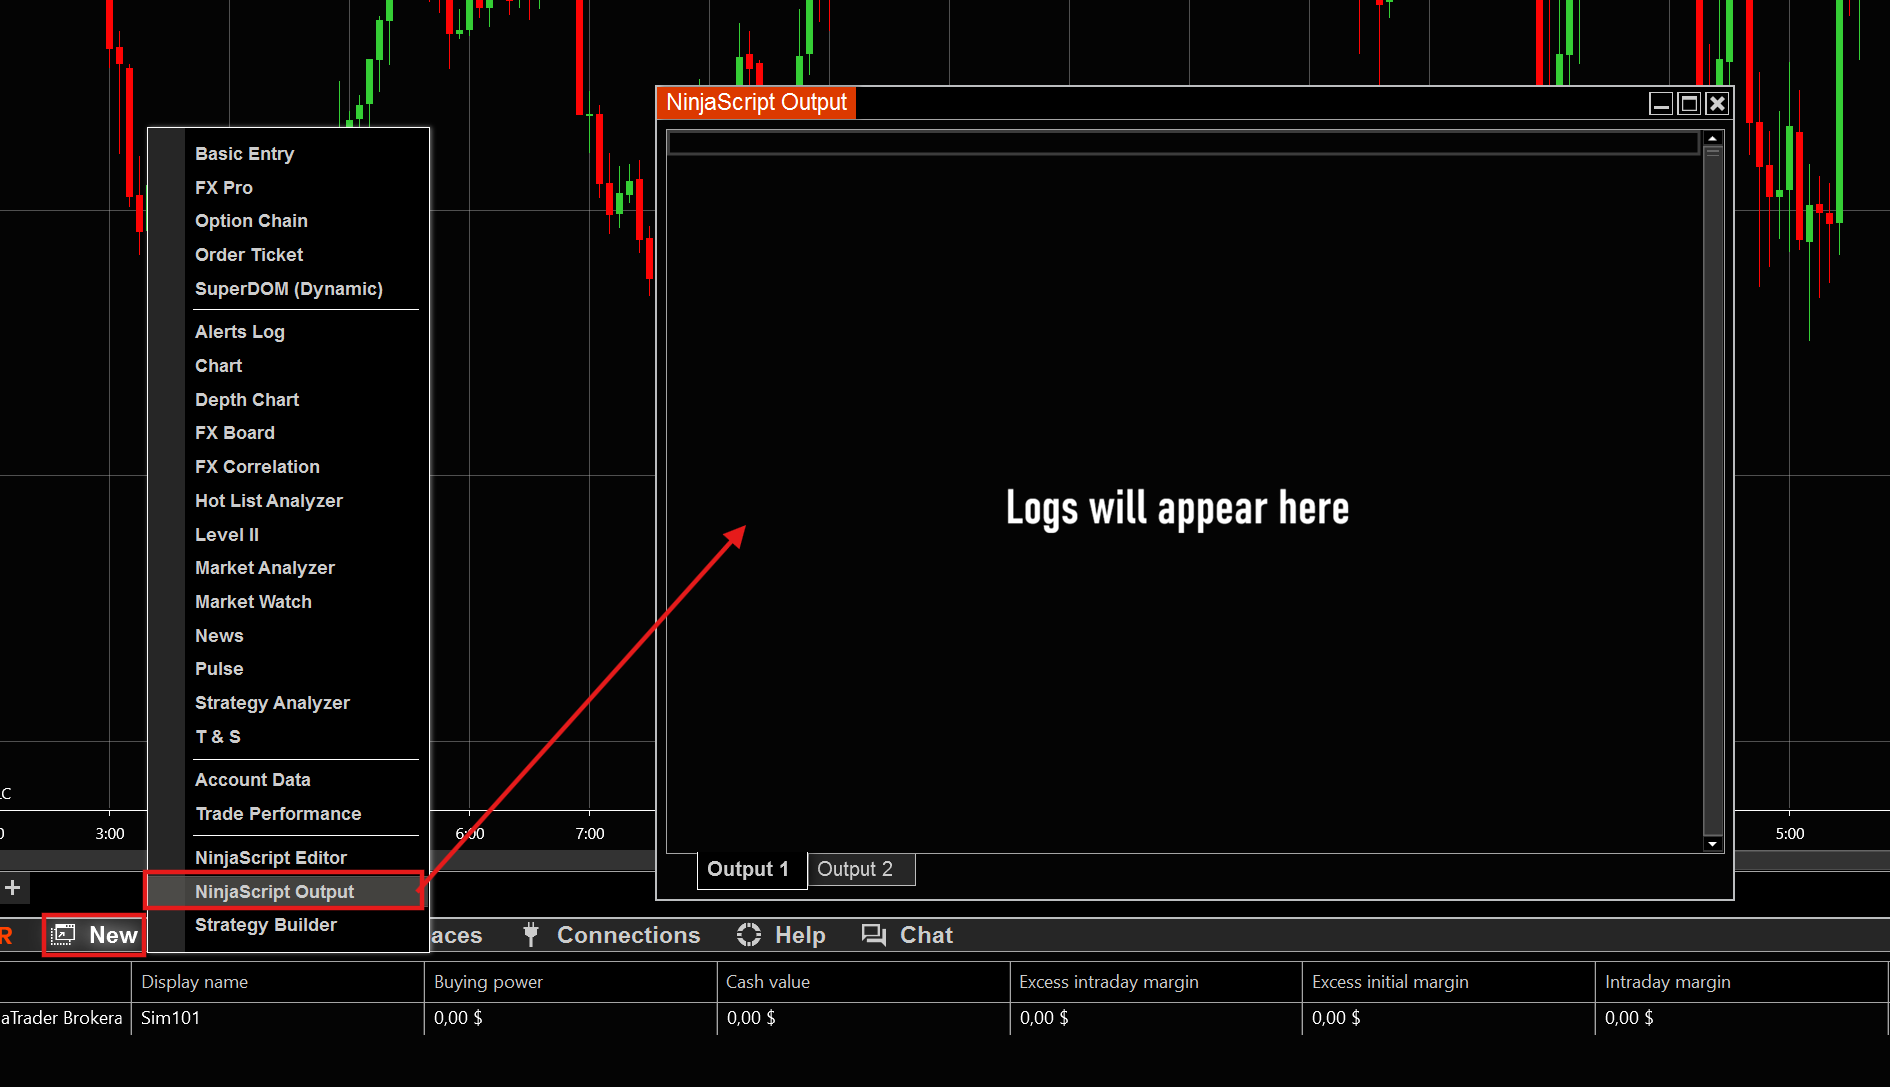
Open the NinjaScript Output window (Control Center → New → NinjaScript Output) to see sync activity. You should see:
[Tradavity] Connected to account: YourAccount[Tradavity] API key validated. Ready to sync.
When you take a trade, you'll see execution confirmations appear here in real time.
Multiple Accounts
If you trade on multiple accounts (e.g. several prop firm accounts), you need one indicator per account:
- Generate a separate API key for each account in Tradavity
- Open a separate chart in NinjaTrader for each account
- Add the TradavitySync indicator to each chart with the matching API key and account
The charts can be minimized — they just need to stay open for the indicator to work.
What Gets Synced
- Every execution in real time (entries, exits, partial fills)
- Prices, quantities, and timestamps
- Commissions (if enabled in indicator settings)
- Position flips (long to short) handled automatically
- Duplicate detection — the same trade is never imported twice
Keep NinjaTrader running until all positions are closed. If NinjaTrader restarts while you have an open position, the indicator will attempt to resume from the server-side buffer. If that fails, use CSV import for that trade.
Real-time sync only captures trades going forward. For historical trades, use CSV import (Option 3).
Tips
- Only live executions are synced — the indicator captures trades from the moment it is active and connected. Historical trades taken before setup are not imported. Use CSV import (Option 3) for past trades.
- Use a simple time-based chart (e.g. 5 minute) for the indicator — tick charts may cause slowdowns.
- Save your workspace after adding the indicator so it persists when NinjaTrader restarts.
- The indicator runs invisibly — it takes no chart space and draws nothing.
- Charts with the indicator can be minimized — they just need to stay open.
- Open the NinjaScript Output window before trading to monitor sync activity in real time.
Common Issues
I took a trade but don't see it in Tradavity
- Open the NinjaScript Output window and check for error messages.
- Verify your API key is correct — you should see
[Tradavity] API key validatedon startup. - Make sure the indicator is enabled and the correct account is selected.
- Check that you have an active internet connection — the indicator needs to reach Tradavity's servers.
I restarted NinjaTrader with an open position
The indicator automatically restores your open position from the server-side buffer on startup. You should see [Tradavity] Restored X open position(s) from previous session in the output. If you don't, or if the position was closed while NinjaTrader was off, use CSV import for that trade.
Indicator not appearing after import
Try the manual installation method: download the .cs file, copy it to Documents\NinjaTrader 8\bin\Custom\Indicators\, then compile via the NinjaScript Editor (right-click → Compile).
Connection status shows "Not connected yet"
- Verify your API key is pasted correctly in the indicator settings.
- Check the Server URL — it should be
https://app.tradavity.com(or the staging URL for testing). - Open NinjaScript Output for detailed error messages.
I have multiple charts for the same symbol
Only add the indicator to one chart per account. The indicator listens to account-level execution events, so it will capture trades on all symbols regardless of which chart it's on. Adding it to multiple charts for the same account will send duplicate data.
Option 2: Auto-Sync via OAuth
Auto-Sync connects to NinjaTrader via the Tradovate API and imports your trades automatically every 15 minutes.
This option only works with accounts that use the Tradovate data feed. Accounts connected via Rithmic, CQG, or other non-Tradovate feeds are not visible through the Tradovate API. For those accounts, use Real-Time Desktop Sync (Option 1) or CSV Import (Option 3).
Requirements
- A Tradavity PRO subscription
- A NinjaTrader brokerage account connected via Tradovate (Demo or Live)
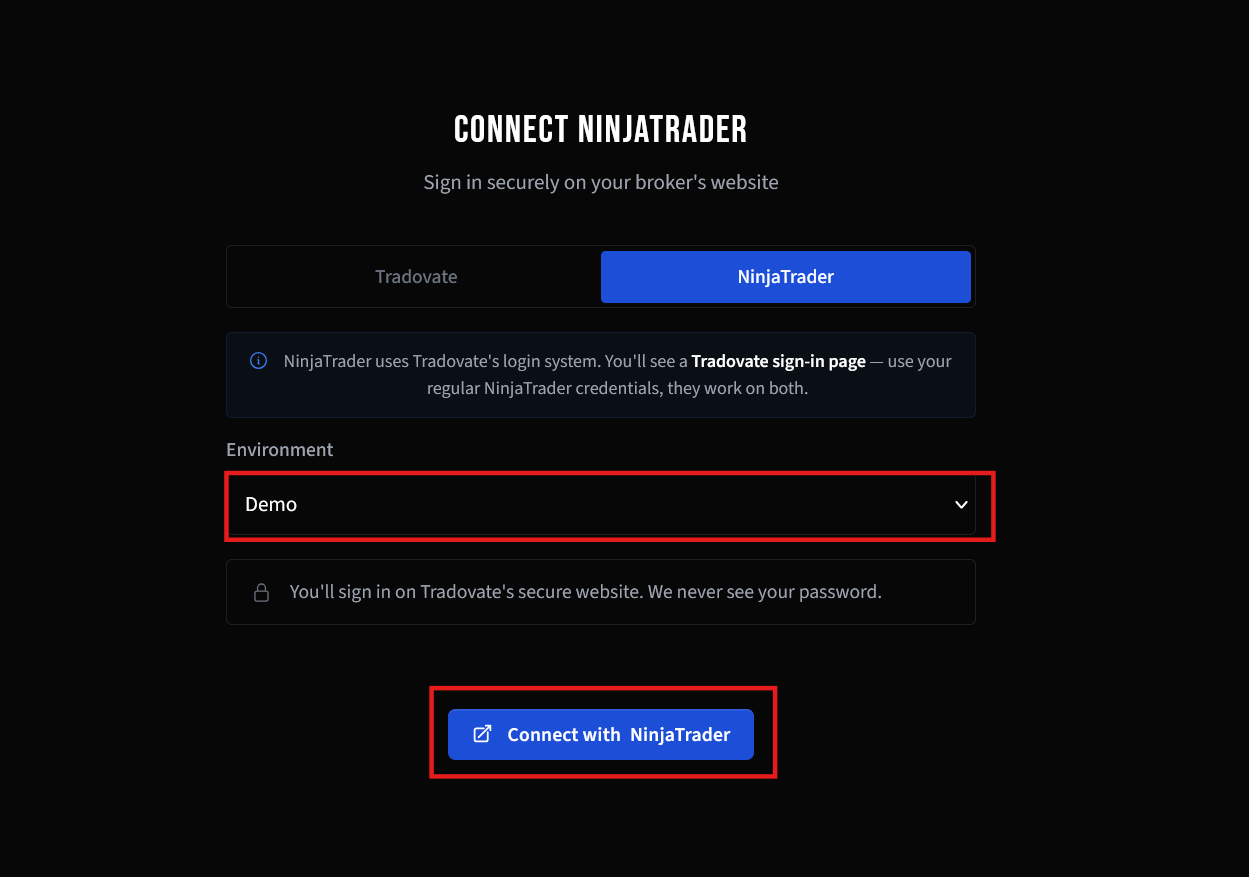
NinjaTrader uses Tradovate's authentication system. You'll see a Tradovate sign-in page — use your regular NinjaTrader credentials, they work on both.
Step 1: Choose Auto-Sync
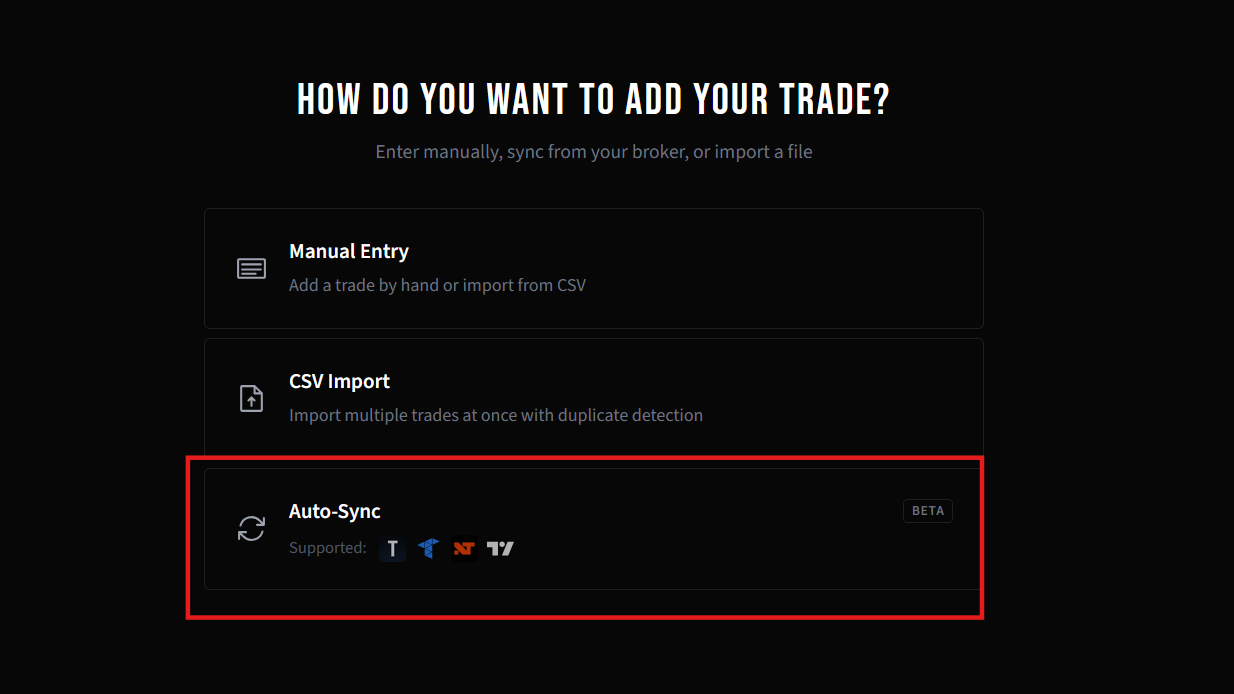
In Tradavity, click Add Trade in the sidebar. Select Auto-Sync to connect your broker.
Step 2: Select NinjaTrader
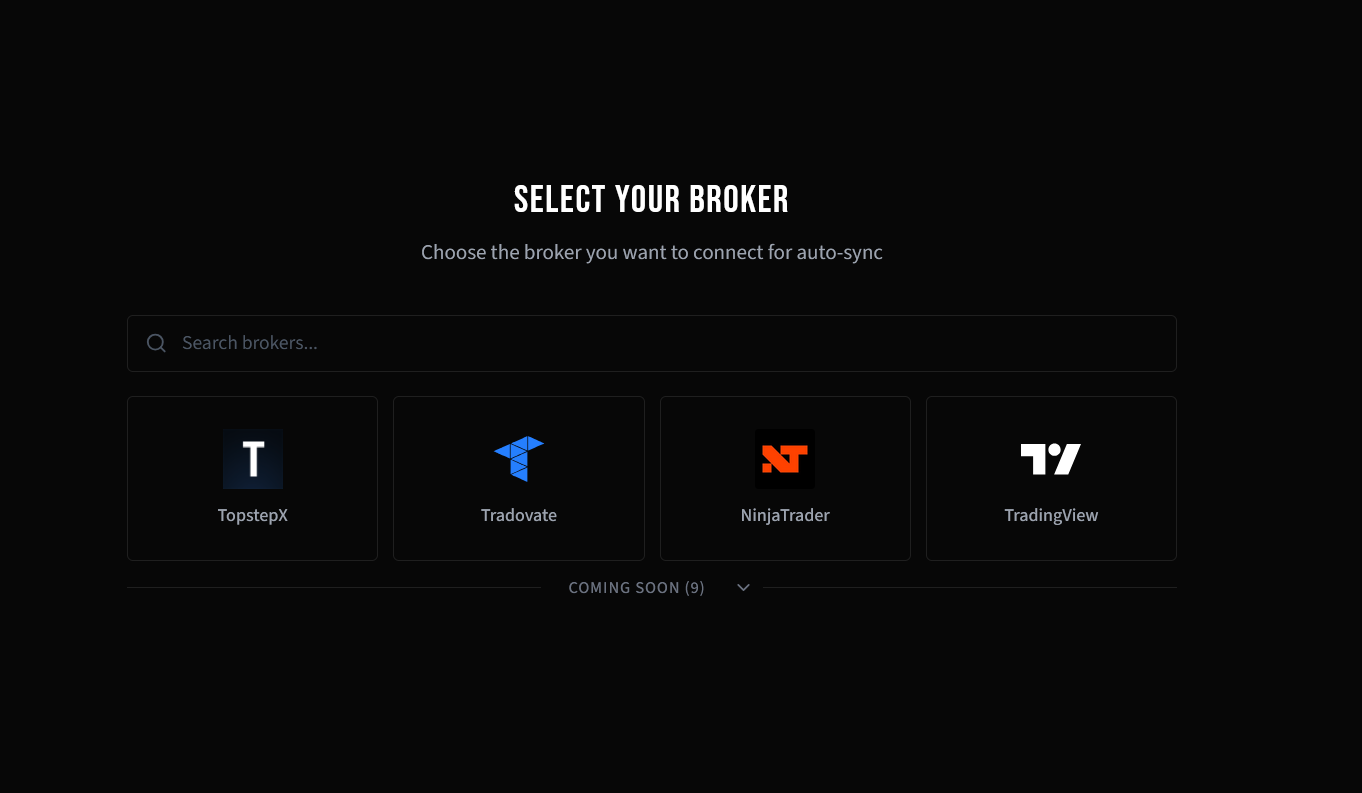
Pick NinjaTrader from the auto-sync broker picker.
Step 3: Choose Environment and Connect
Select your NinjaTrader tab, choose Demo or Live environment, then click Connect with NinjaTrader. A popup window will open.
Step 4: Sign In on Tradovate
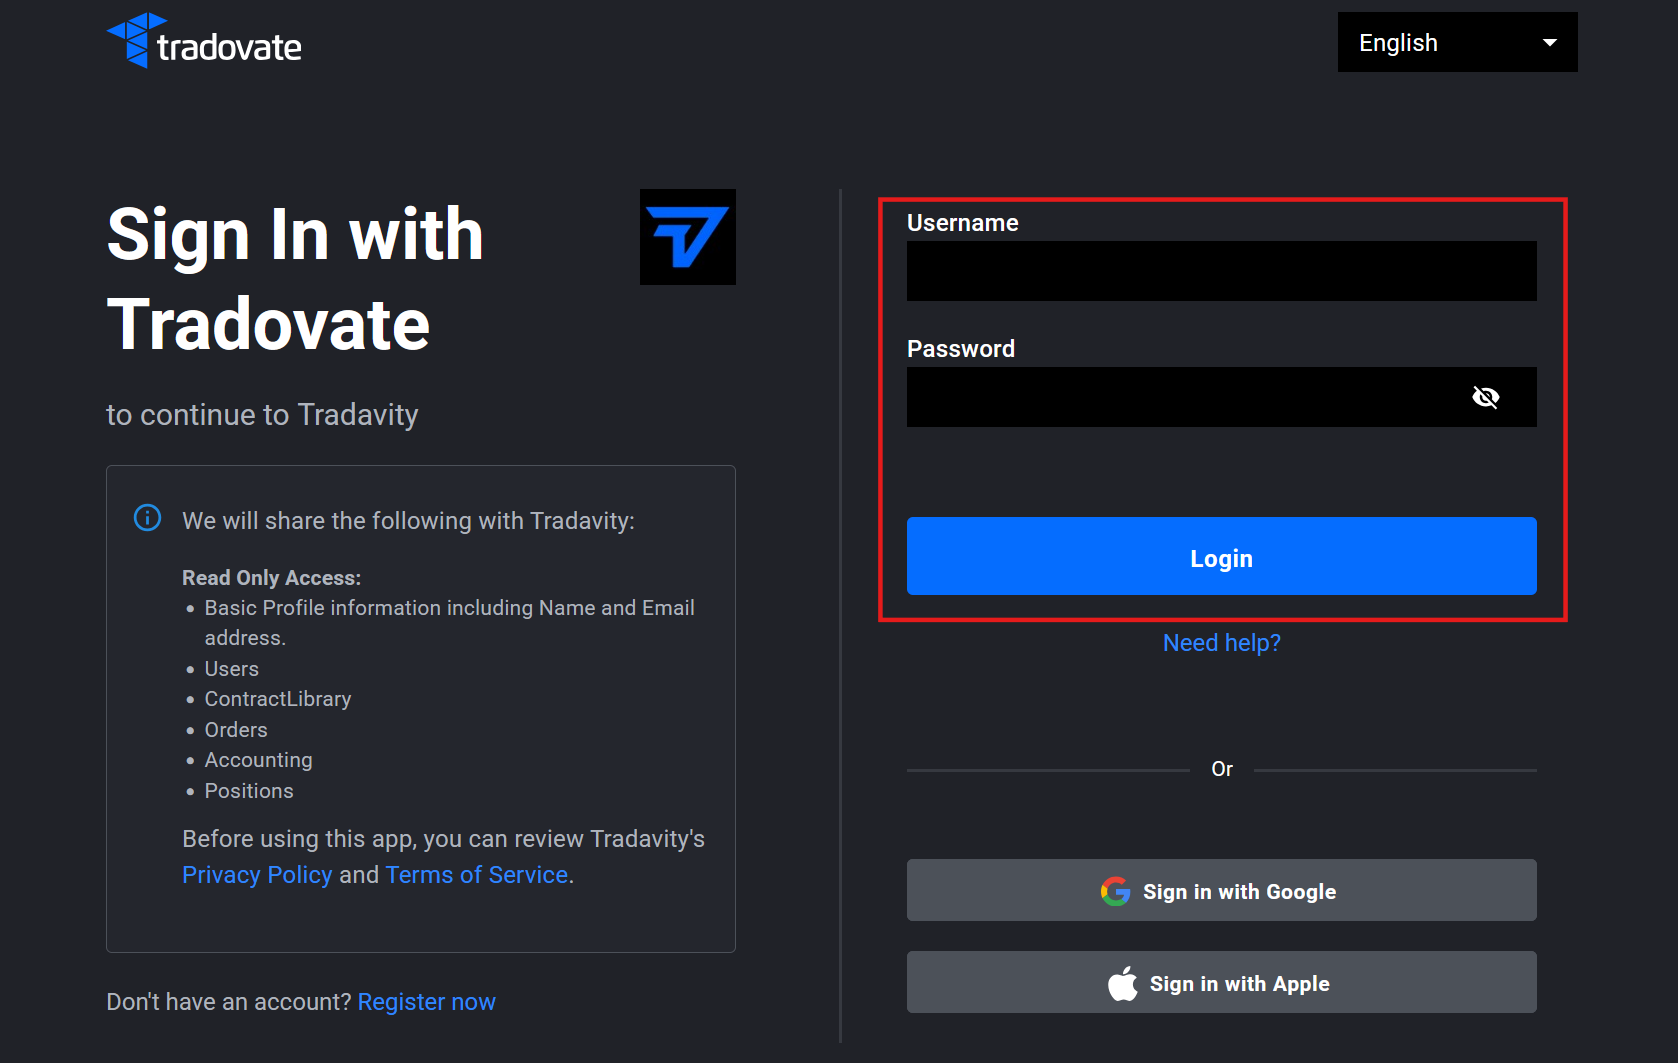
In the popup, sign in with your NinjaTrader credentials on Tradovate's secure website. We never see your password.
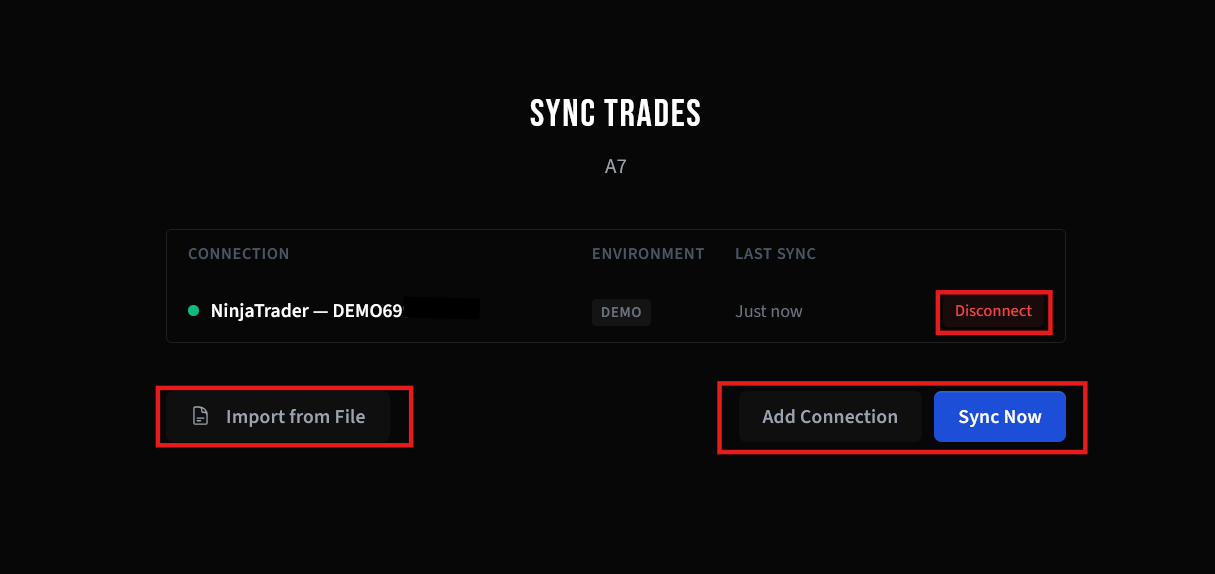
Step 5: Connected
Click Sync Now for an immediate import, or wait for the automatic 15-minute sync.
Option 3: CSV Import
Manually export and upload a CSV file from NinjaTrader 8. Works with any account type.
Tradavity supports both Trades and Executions exports from NinjaTrader.
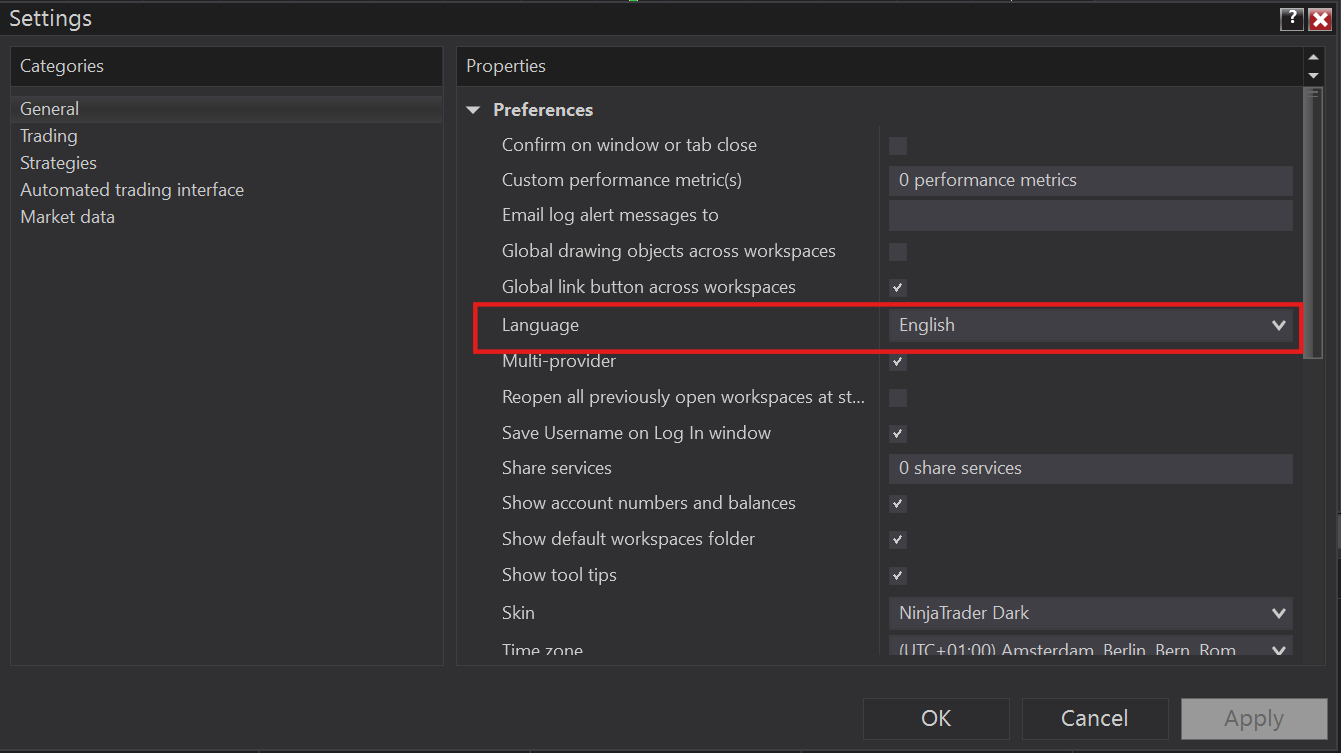
Important: Set Language to English
Before exporting, make sure NinjaTrader is set to English. Go to Tools → Options → General, set Language to English, and restart NinjaTrader.
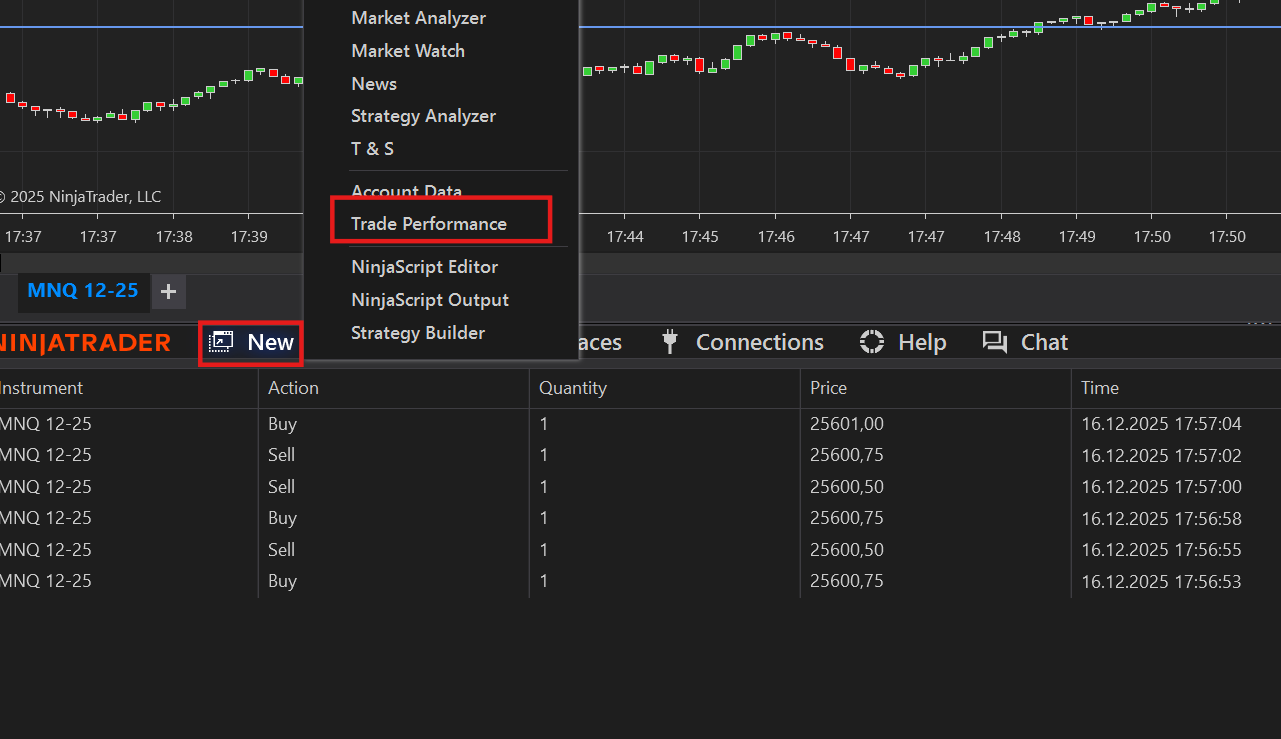
Step 1: Open Trade Performance
In NinjaTrader, go to Control Center → New → Trade Performance.
Step 2: Select Display Type and Generate
Click the Display dropdown and select Trades (recommended) or Executions. Set your date range and click Generate.
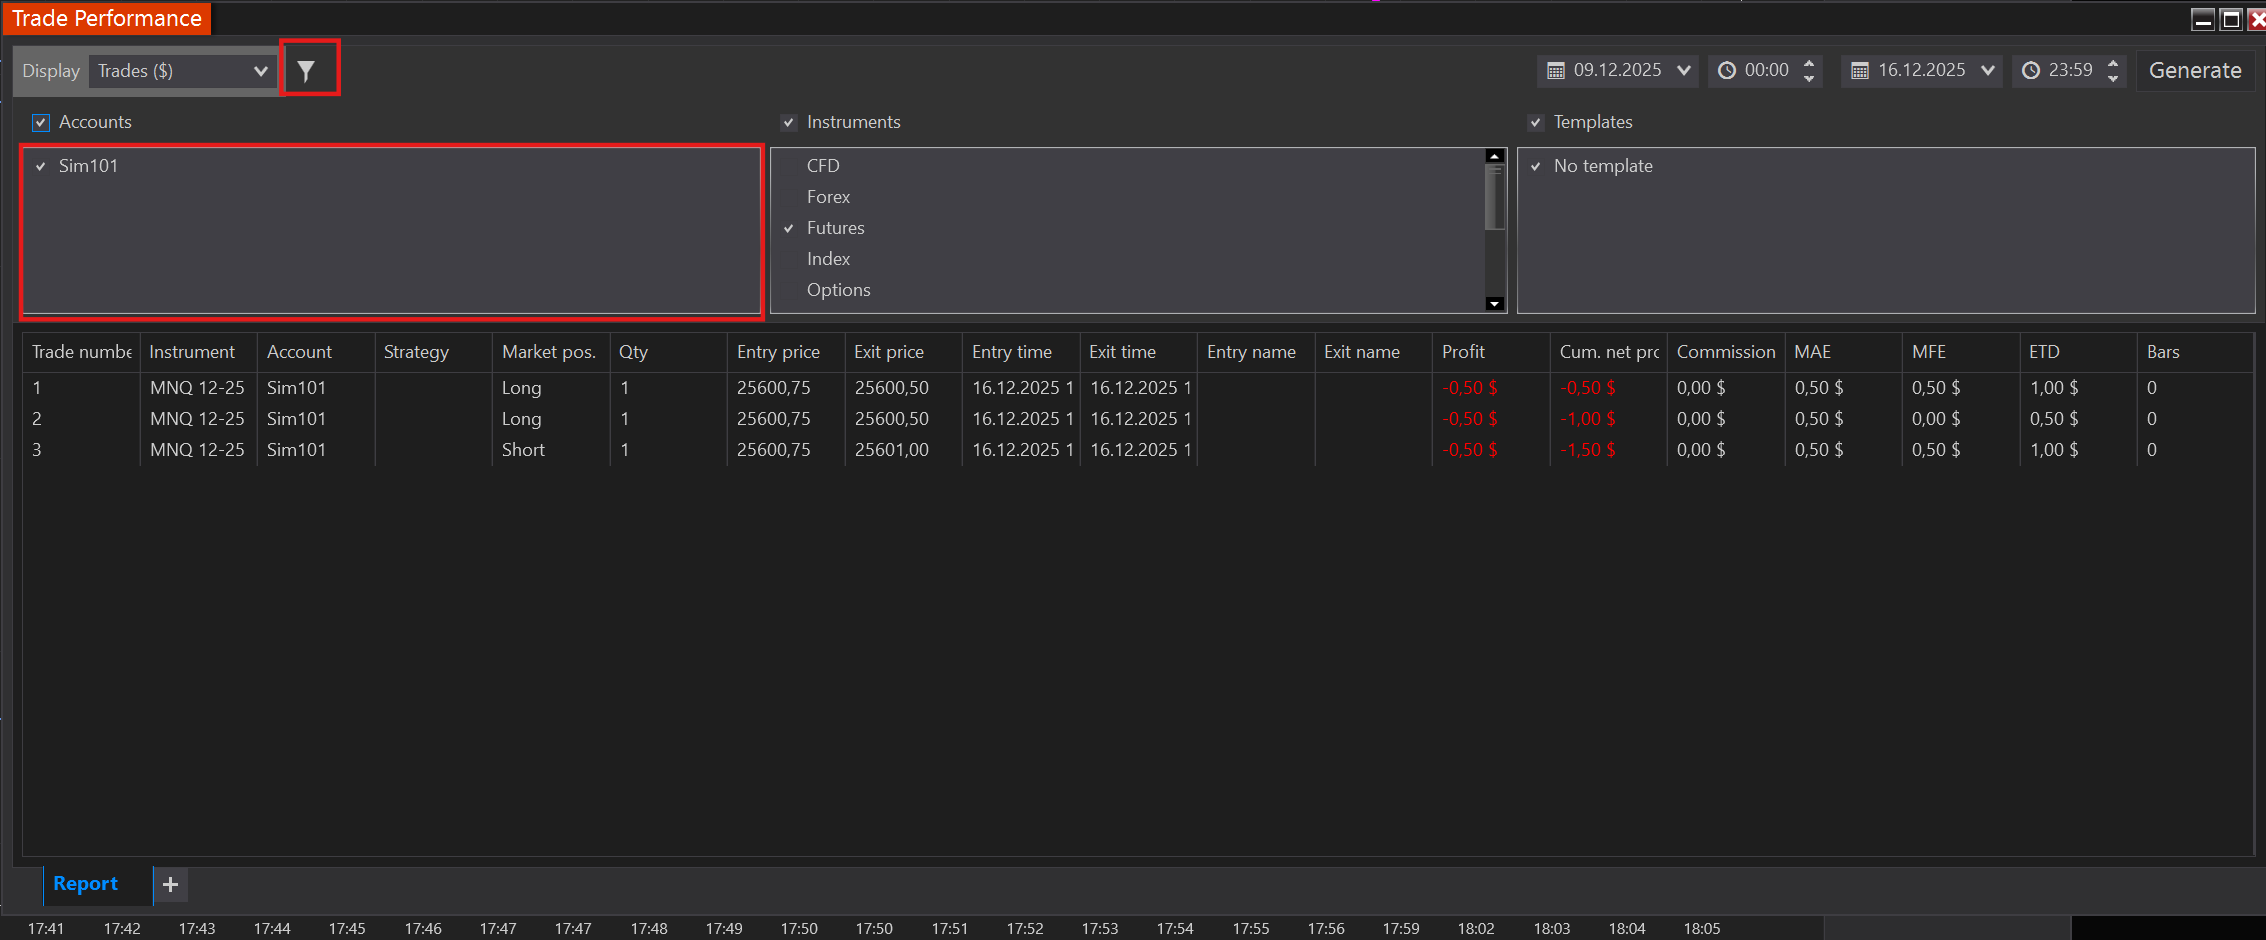
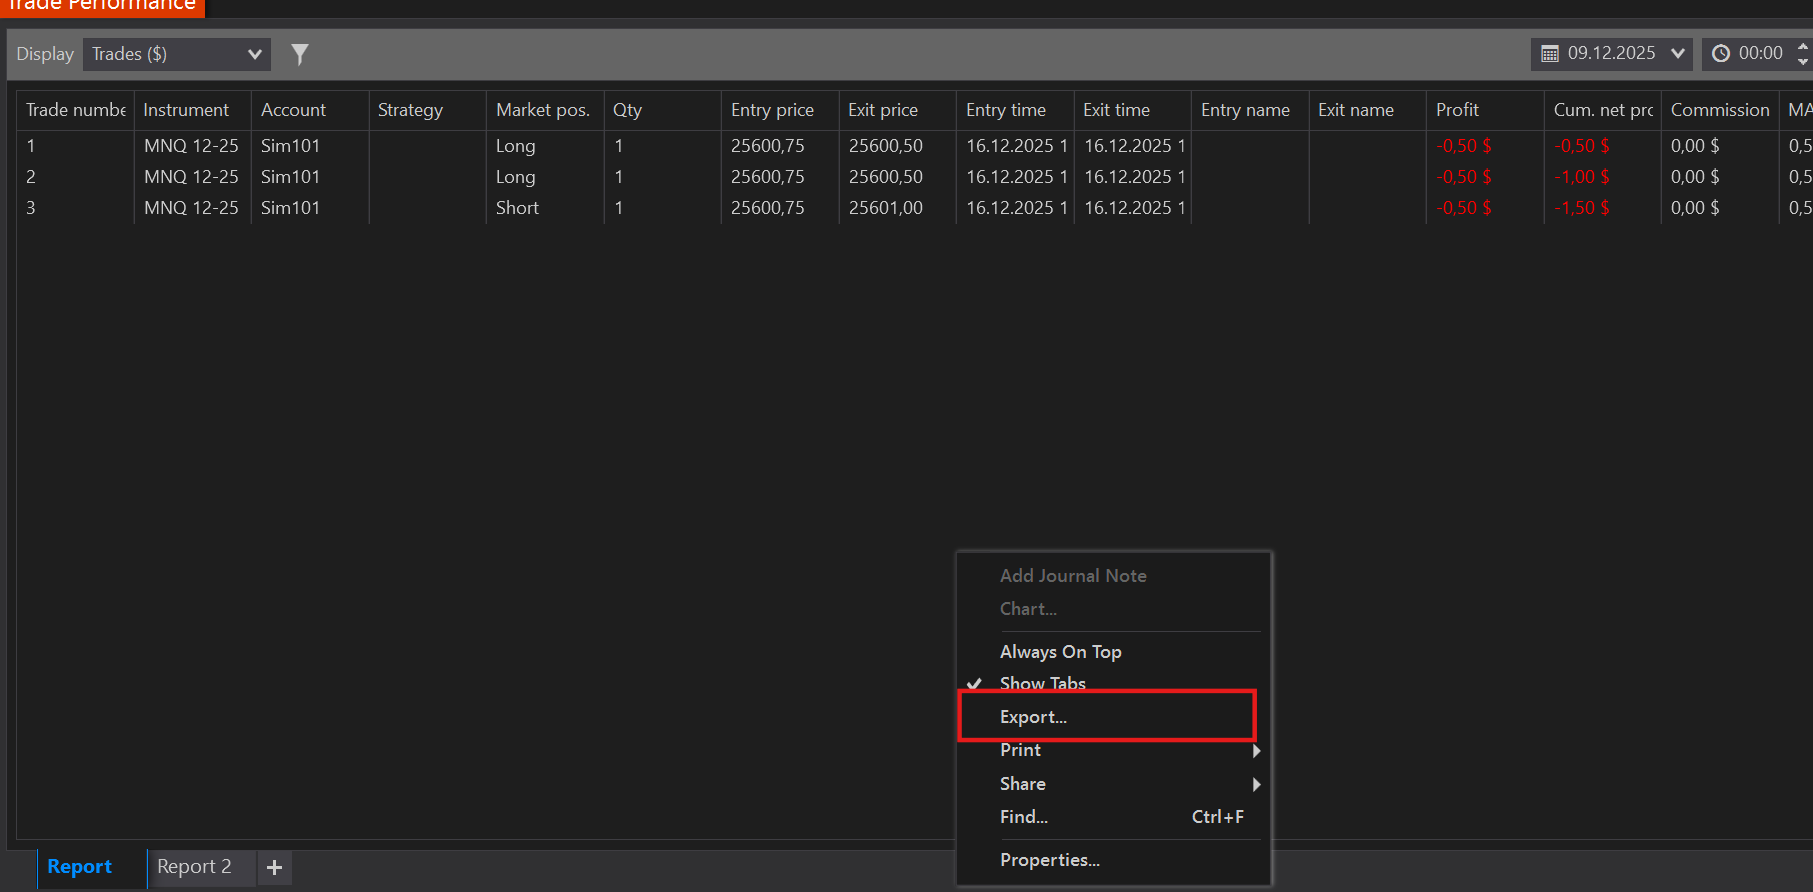
Step 3: Export to CSV
Right-click in the results list and select Export. Save as CSV.
Step 4: Import in Tradavity
In Tradavity, go to Settings → Accounts → Sync → File Import. Select NinjaTrader, choose your CSV type, upload, review, and import.
Troubleshooting
- Make sure NinjaTrader is set to English before exporting
- Verify you selected the correct export type (Trades vs Executions)
- Don't open and re-save the CSV in Excel — it may change the format
- If dates appear wrong, check that NinjaTrader uses European date format (DDMMYYYY)
See CSV Import Troubleshooting for more solutions.
Data & Security
Real-Time Desktop Sync (Option 1)
- An API key (stored securely server-side) authenticates your NinjaTrader indicator
- We only receive execution data (prices, quantities, timestamps)
- We cannot place orders, transfer funds, or access your broker account
- You can revoke your API key at any time from Settings
Auto-Sync via OAuth (Option 2)
- An OAuth access token (stored encrypted with AES-256-CBC) grants read-only access
- No username, password, or personal credentials are stored
- You can disconnect at any time — the token is immediately and permanently deleted
CSV Import (Option 3)
- Your CSV file is processed in memory and never stored on our servers
- Only the parsed trade data is saved to your account
NinjaTrader® is a registered trademark of NinjaTrader Group, LLC. No NinjaTrader company has any affiliation with the owner, developer, or provider of the products or services described herein, or any interest, ownership or otherwise, in any such product or service, or endorses, recommends or approves any such product or service.
This integration only grants read-only permission to access your trade history. We do not have any trading, transfer, or account modification permissions. Tradavity is not responsible for any data discrepancies or service interruptions. Use of this integration is at your own risk and subject to NinjaTrader's and Tradovate's respective Terms of Service. See our Risk Disclosure for full details.